- Decide the Size & Placement of Your Design
There are some standard sizes and placements that many printers recommend, but the best way to decide what works best for you is to create a real life mock up. Print your design out in full color at a few different scales and see how it actually looks on the body. I recommend physically pinning the artwork onto the shirt while someone is wearing it, so you can really get a feel of how it looks best. You’ll also want to watch for awkward placements and make sure designs don’t land in the wrong place on the chest (i.e. note where dot hit on nipples!). Don’t forget to review it across different size garments since chances are you’ll only be printing the design at one size. - Convey Specs to Your Printer
Once the size and placement is decided, you need to convey this information to your printer. If you’re printing with artwork in a standard location at a standard size, this may not seem necessary, but it’s best to provide detailed layout instructions to your printer so they know exactly what to do and there is no margin for error. Additionally, this creates a paper trail of your instructions so if anything comes back wrong, you have notes on how it was supposed to be. If you have access to Illustrator, Photoshop or another design software, it’s best to do this on the computer. If not, you can also do a hand sketch.
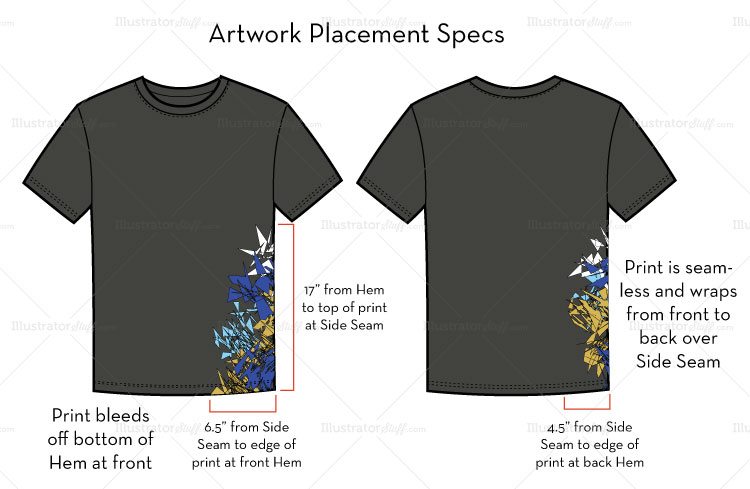
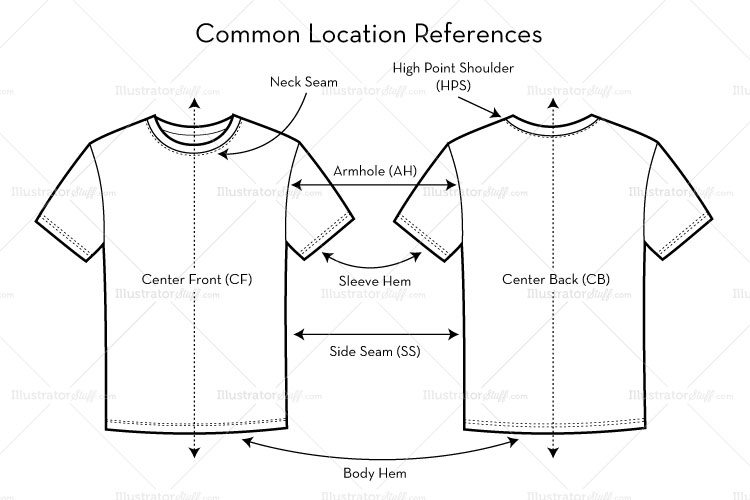
- Callout measurements of where the artwork hits on the body from common locations. Some of these locations (and well known abbreviations) include:
-
- Neck Seam: Where the collar or ribbing is sewn into the body of the garment
- High Point Shoulder (HPS): The highest point of the shoulder of the garment, not including the collar or ribbing
- Armhole (AH): Where the sleeve of the garment is sewn into the body, or where the sleeve opening is on a sleeveless style
- Sleeve Hem: The bottom edge of the sleeve
- Side Seam (SS): Where the front of the garment is sewn to the back of the garment. If there is no seam, then this verbiage is used to reference where the seam would be when the garment is laying flat.
- Body Hem: The bottom edge of the body
- Center Front (CF): The center line running vertically down the front of the body
- Center Back (CB): The center line running vertically down the back of the body
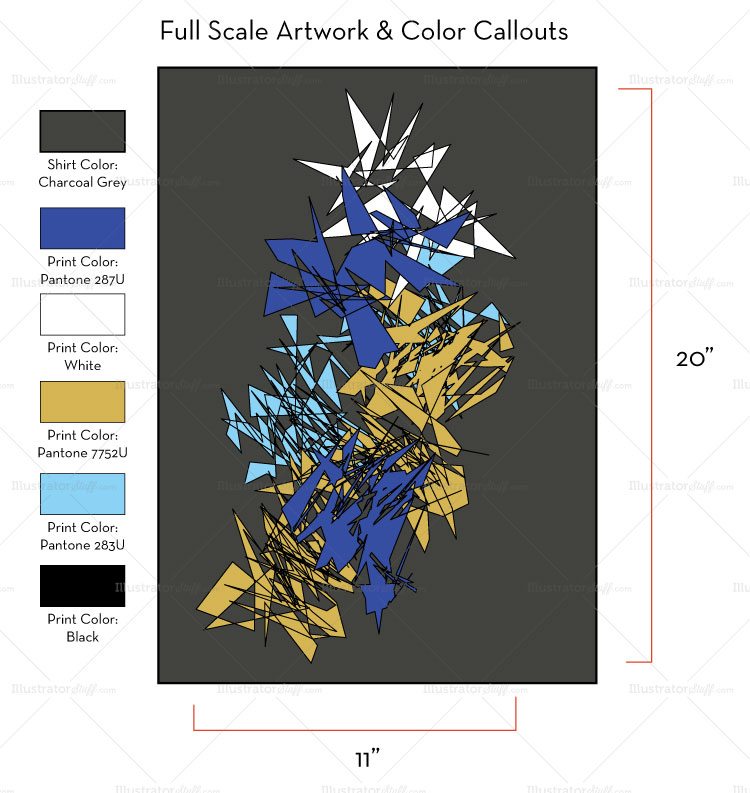
3. Full Scale Artwork & Color Callouts
Specify the full scale size of your artwork to ensure it prints at the correct scale. It’s often wise to provide the printer with the artwork file at full scale so no changes are needed. You’ll also want to make sure your printer knows what ink colors you want to use! Check with them to see what ink system they use that you can match to (Pantone is a widely used color system, so if you have access to the correct Pantone book, that will be helpful). Otherwise, work with your printer and see what they can do to help you match your colors (if they’re local you may be able to stop in and pick out the colors on the spot, or they may be able to send you a swatch card). You’ll want to specify each color in the artwork so they know what to print where. You’ll also need to limit your colors to whatever your printer or budget allows for. Each color adds an additional screen, and this can add up quickly!
All of this may seem like overkill or too much work, but when you’re investing in product, you want to make sure it’s done right and you love the final result. Going through each of these steps will absolutely ensure your designs are executed correctly and you’re proud of the final product.
Fashion Flat Templates courtesy of Oluna and Fractal Girl at Illustrator Stuff.
Fashion tech evangelista Sew Heidi is founder of Illustrator Stuff, an online marketplace for vector fashion flats, repeating patterns and more. She’s worked professionally as a fashion designer and educator for over 10 years, working with companies to design, spec and source apparel for overseas manufacturing.
Need an E-Commerce Website?
 Shopify is perfect for beginners and experts. You don't need to have any technical or design experience to easily create a beautiful online store with your branding. Choose from tons of well designed e-commerce templates that look great on desktops, phones, and tablets. Easily customize, create pages, add products, and you're pretty much ready to accept payments. Plans come with a free no risk 30 day trial period.
Check out our in depth review of Shopify here and see why Shopify is our number 1 recommended shop for clothing companies.
Shopify is perfect for beginners and experts. You don't need to have any technical or design experience to easily create a beautiful online store with your branding. Choose from tons of well designed e-commerce templates that look great on desktops, phones, and tablets. Easily customize, create pages, add products, and you're pretty much ready to accept payments. Plans come with a free no risk 30 day trial period.
Check out our in depth review of Shopify here and see why Shopify is our number 1 recommended shop for clothing companies.